Data bundles serve the purpose of linking data source objects (data from various origins) to DMOs and establishing DMO relationships, which ultimately facilitates segmentation. Salesforce offers predefined standard data bundles by default (see Figure 6.13). These standard data bundles simplify the process of mapping incoming data to the Data Cloud data model. However, you have the flexibility to opt out of using the standard data bundles and instead, create your custom mappings as per your requirements.

Figure 6.13: Some standard data bundles for connecting to Salesforce CRM
Data Ingestion
Returning to the steps for ingesting data, we will now demonstrate the steps for ingesting and modeling data from Salesforce Sales Cloud. For ingesting and modeling data from other sources, please refer to the Data Cloud documentation for detailed steps (the reference to the documentation is provided at the end of this chapter):
- Click the App Manager and select Data Cloud.
- Navigate to the Data Stream tab.
- Select the All Data Streams list view, and then click the New button on the right.

Figure 6.14: New Data Stream View
- Click the Salesforce CRM in the connected source section (see Figure 6.14).
- Select the Salesforce Org, and then either choose Data Bundles or All Objects and select the objects from which you want to ingest data (see Figure 6.15). Click Next.

Figure 6.15: Select the data bundles from which to ingest data
- Select the desired fields. If you want to do certain transformations, then use the New Formula Field option. Click Next.
- Review and Deploy (see Figure 6.16).

Figure 6.16: Review the data stream bundle selection and deploy
Data Modeling
After ingesting data from different sources, we need to map the incoming data to data objects in Data Cloud.
We will now go through an example of mapping the data we ingested from Salesforce CRM. For more details on mapping data coming from other sources, please refer to the Salesforce Data Cloud documentation.
To map the data, follow these steps:
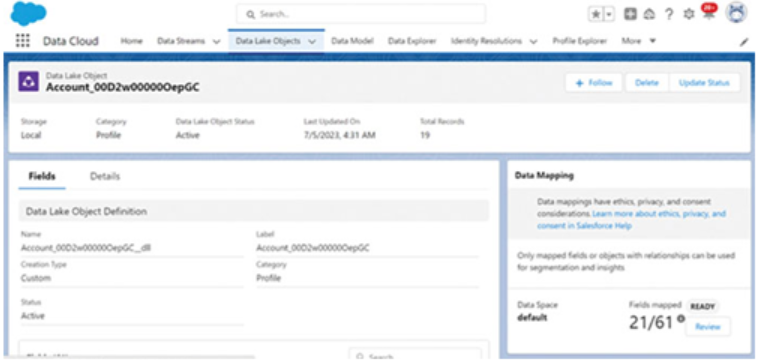
- Ingest data from three objects: Accounts, Lead, and Contact. You can go to these data streams from the Data Streams tab or the Data Lake Objects tab. For this example, click the Accounts data stream.
- Click Review on the data mapping section on the right (see Figure 6.17).

Figure 6.17: Review the data mapping by clicking the Review button
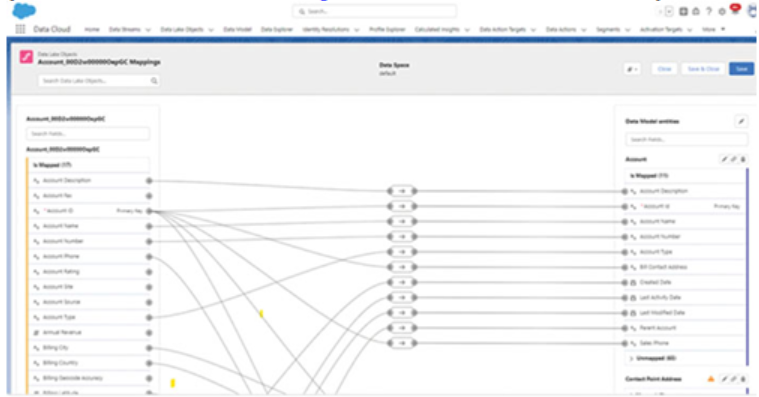
- Map the Account object fields with the corresponding Data Lake Object field (see Figure 6.18).

Figure 6.18: Data Mapping screen
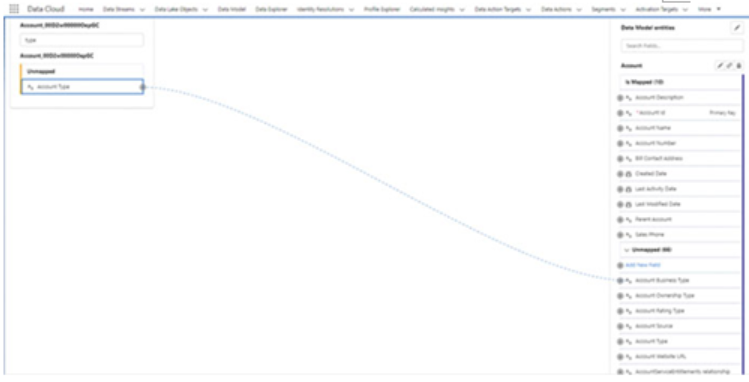
- Click any of the joins in the middle to delete the mapping. Search for the field to be mapped and click the field. Then, drag the mouse to a field on the right side and click that field to map it to the concerned Data Lake Object field (see Figure 6.19). Save the mapping.

Figure 6.19: Map a field to the corresponding field in the Data Lake Object model
- Repeat the process for all other sources of data. Once done, you will have completed the data modeling stage.

